talvez vcs gostem !!!
como é grande, vou só repassar para vcs o conteudo original, escrito por (Priest) no forum Milsim Empire (link: http://milsimempire.com/forum/viewtopic.php?t=1034)
________________________
I am writing this article for several reasons. First, so that those of you who are thinking of building a main battle tank (MBT) can see what goes into it. Second, for those of you who are in the constant, never ending process of building one may get some ideas and this may help you in your construction. Third, so that those of you guys and gals who are ground pounders may appreciate all the hard work and effort that goes into making one of these. I will start first off by saying I can not take full credit for building this monster. I have the triumphs and monumental failures of my two predecessors’ builds to look back on and their guidance and help in my build. So first, thanks, Ken Spencer (ODX 221 “Wallace”) and Rodney Smith (ODX 223 “Beast”). I would also like to thank Ray “Harley Hunk” Adams and Billy “Tank” Williams for their massive help in the effort to get my baby virgin tank ready for the MPP Guadalcanal Game at Command Decisions Wargames Center. To the other members of Team ODX who helped make this possible, Ferg, Bishop, Spectre…Thanks. And certainly last but not least thanks to Jennifer Spencer for loaning me her husband for countless hours and allowing me to build yet another ODX monster in her driveway.
Now down to business. I am going to try to write this article so that it is in chronological order from draft to fighting form and TRY to keep it updated on a monthly basis so that you may see its progress and growth. However there will be some major gaps in some of it due to operational security. As much as I want to help the tankers and the tank community, I come to win. Please bear in mind this is a work in progress. It is at least two years from being complete. There are so many ideas that will be implemented in the “B” “C” and “D”… models. You get the point? As I said to those who are thinking of building a tank it is never ending.
Drafting….
This is where you start. You don’t just walk in to the shop and start throwing ply wood onto you golf cart lawn mower. There are several types of paint ball tanks. Each have their advantages and disadvantages. First, you must decide whether you want and can afford the typical cute little toy tank that roams most fields; or whether you want the sheer monstrosity of a main battle tank. Next, you should decide what it will look like. You may choose to pattern it after an existing tank; maybe you want the Scorpion from Halo, or maybe you have a totally radical design that you want to try to build. We chose to model our 3rd generation tank after an American Bradley IFV. I bought several models so that we would have a scale 3D reference to look at. I also had a chance to crawl all over a real Bradley and was not restricted in how many pictures I could take of it, that helps when it comes to detail time. After your basic design is chosen you must get a donor vehicle. Some vehicles are better suited than others. Trucks and vans tend to work better. They tend to have more engine than the vehicle needs. Their suspension and frame design tend to be over built to handle extra weight. That is what you want, because I guarantee you, it will weigh more than what you think it will (mine is around 5500 lbs) and I have never heard of any one putting there tank on a diet. Make sure that your donor vehicle is in good running order, has a sound drive train and engine, and that the steering, suspension, and frame are in good shape. You don’t want to cheap out on a donor vehicle. It will bum you in the end with performance issues. It sucks to put all that work and money into a tank to get a vehicle that can’t make it up the hills. I speak from experience, I know. I was given a 1996 Chevy Astro van for free that had just had a new motor, new tires, new brakes, and new steering components put in, and just had it yearly service, even got a full tank of gas in it…down side is 3rd gear and Over Drive were torn out of the auto transmission. It kind of sucks because I can only hit the “crunchies” at 45 MPH. but the price was right, FREE!
Gutting the Donor Vehicle
By now you should have a pretty good idea on paper of what you end result is going to be. You should have the donor vehicle already because it is now time to start the build. You don’t have to have every thing planned to the “T” and drawn out on auto CAD, this is a rolling evolution. Most of your plans will change if not all of them. We got lucky in our donor vehicle selection and the decision of what to build was more like “that Astro van looks kind of like a Bradley”. So we started by making a clean palate to work on and cutting all the fat away that we could to try and lighten up. All the glass came out hammers and a Saw-Z-All. All the doors, lights and interior shelving came out and the seats came out. We pulled the hood, fenders, and bumpers off. If we were smart we would have carefully taken the parts of and sold them on E bay, but we are paint ballers and made a dumpster full of garbage instead. We also disarmed the air bags.
NOTE: On newer vehicles there is a computer with a lot of sensors and a system called OBD that control everything from engine function to air bag and brakes be careful when you cut and gut not to destroy the wiring harness.
Framing and General Shape
We knew almost from the get go that we were going to have to do what the hot rodders call a “chop job” to get the lowered profile we wanted. This was a problem. Astro vans are uni-bodies (the frame is an integral part of the vehicle’s body). We worried that if we cut the roof off it would cause the structural integrity of the vehicle to weaken and when all the plating and turret went on, the whole body would collapse. How did we solve this problem? Like paint ballers, “screw it! Cut her up”. Once the top came off we immediately tied all the vertical “A” and “B” pillars with heavy double steal “uni-strut”.
Uni-strut…topic for discussion. What do I frame my tank out of? That is for you to decide. Our second generation tank, ODX 233 the “Beast”, is primarily framed out of wood. The builder is a carpenter. He can do things with wood that I can only dream of. I am an electrical contractor, fabricator, truck guy and I like steal. Once again we got lucky. I had just demoed a factory and got A LOT of what is known to electricians, plumbers, and HVAC techs as “uni-strut”, “B-line”, or “Kendorff”. Its cross section is like a “C”. It comes in three thicknesses (7/8”, 1 5/8”, and 3 2/8”) and typically has pre-punched holes on 3 sides so that bolts, rods, and the like may pass through it with out the installer drilling holes. This is beneficial to a tank builder for 2 reasons. It is lighter, and when I bolted my plating on I did not have to drill the steel. Not to mention it is zinc plated and will not rust, and again it was free!
The “double strut” (3 2/8”) was used to make the frame for the turret ring, and the roof of the hull section. The “strut” (1 5/8”) was used for all structural and load bearing framing. And the “baby strut” (7/8”) was used to make all the little design and shape framing. All in all there are about 50 sticks of varying sizes of strut in the tank right now, remember she is going to get fatter. My advice when framing is to take your time and be patient, do it right. I know it does not look like a whole lot and no one will probably ever see it but it will directly affect you final result.
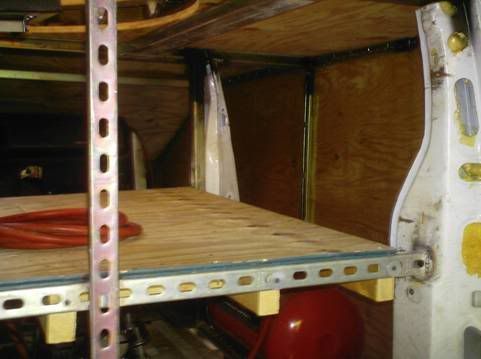
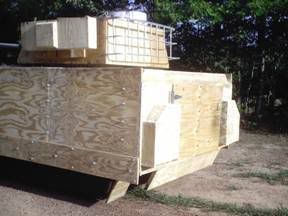
In this picture you can see the main support roof beams (double strut) and on the right side if you look closely you can see some of the body shape framing (baby strut). Notice how we tied the built frame into the pre-existing frame of the Astro van.
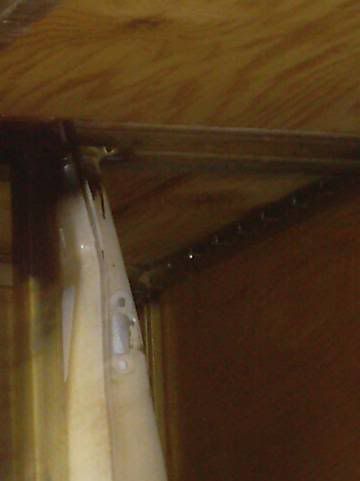
Another framing picture. This one shows where all the front beams tie in
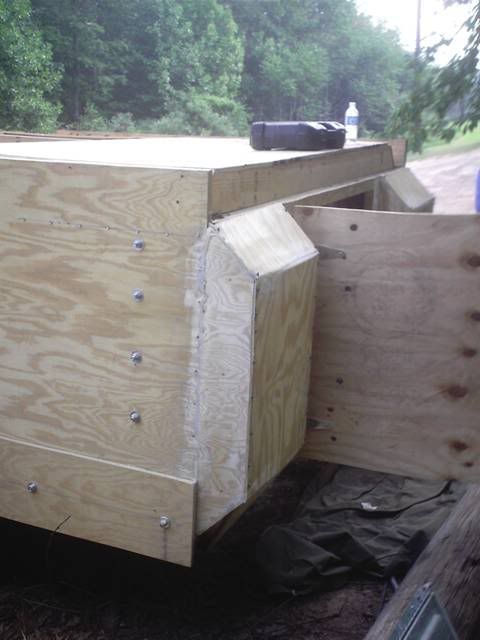
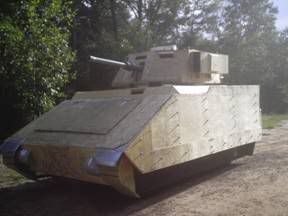
Plating
Plating was the simplest part. When I say simple, you take the power tools out of it and most middle school kids could do this. My tank is patterned after the Bradley IFV and is very boxy and has few angles in it. We simply put the pieces of ¼” ply wood, not OSB board, up to the strut steel frame, oriented the bottom edge of the sheet, traced it on the back side, and finally cut it out. We made sure that we did not permanently attach any plate pieces until we had all of them traced out. When it came time to attach the plates we used somewhere in excess of 450 ½” bolts and nuts, 900 ½” flat washers, and as many split lock washers. All hardware was silver zinc plated to fight corrosion. The plate sheets were also glued on using about twenty tubes of liquid nails between the steel frame and the plates. The bolts and plates were put together in a fashion to mimic the “appliqué armor” on the Bradley.
Note 1: Use ply wood, not OSB particle board. OSB tends to be slightly heavier for a given thickness and becomes extremely weak and sags when the moisture, rain, and weather get to it. I know OSB is cheaper than ply wood but use the best ply wood you can afford. You will be happier in the long run and it will be cheaper in the long run as well.
Bear in mind as you plate, the sides do not need to be extremely thick as their only purpose is to stop a paint ball. However the roof, hood and any surface that some one can walk on should be sufficient to hold more people than the suspension can. Every time our tanks go out, at any given time when not in play there are at least 5 people crawling all over, around and in the tank. Metal is not suggested for plating material due to the added weight, and the ridiculously loud sound of multiple rounds hitting it.
Note 2: Using wood, allow for expansion and contraction. Swelling and shrinkage WILL occur no matter how well you waterproof your tank. It WILL leak. It will swell, it will crack. Just be prepared to fix it.
Note 3: My tank is like a real tank. You use roof hatches to get in and out. However, when you are plating be conscious of things such as engine maintenance, changing a tire, or simply putting gas in it. Try not to build a vehicle that will be a nightmare to do something as simple as putting gas in it. Some of these things you will catch during the initial build. Some will be necessitated due to stupidity…I forgot to extend and add a port to fill the gas tank.
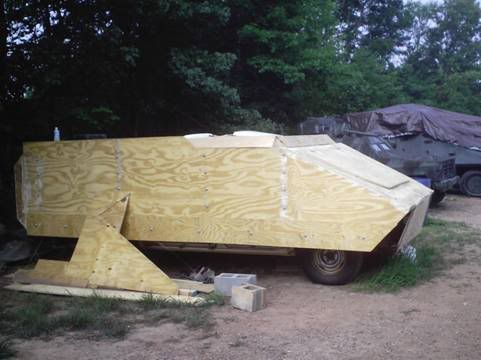
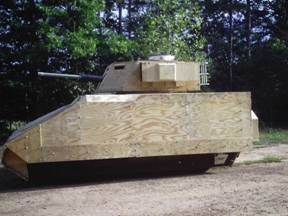
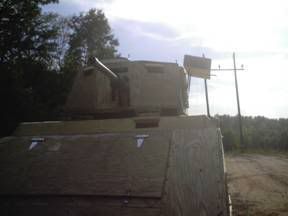
Side and frontal shot. Tracks not yet built. Notice ODX 223 Beast in background under tarp
Turret:
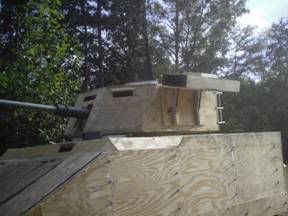
Now we are getting towards the end. The hull is in a semi-complete form. Now we turn our attention to the business end of any tank, the turret. To be honest, until we started the turret I had lost most of my drive to build this machine. But, when the turret went on it started to look like a real tank. The turret was the hardest thing thus far to build out of wood. My turret is both framed and plated out of wood. The turret in mine is the hardest ODX has built to date. There were more angles and rolling angles than either of the others. The base of the turret is the floor plate (¾” high quality ply-wood). The frame was built on top of the floor plate using a combination of 2x4 and 2x2 lumbers. For fasteners we used drywall screws in the course thread flavor (never use nails, they will pull out due to expansion and contraction). Ohh and my favorite…about another 4 tubes of liquid nails. Finally the roof was supported with 2x4 and a piece of double strut. The strut was put in to help fight the forces of torque from the power traverse mechanism which we will discuss later. Then we plated it as normal but left the roof off for easy access. When you build your turret you must think…a lot. This is where planning, creativity and the ability to be willing to keep trying comes in. If your turret is going to traverse, powered or manually, you must have thought about this when you were building the hull section. Provisions need to have been made before hand. My turret weighs around 600 lbs empty, without the two crew members, paint, guns, cannon, or any other equipment and it is already getting heavier.
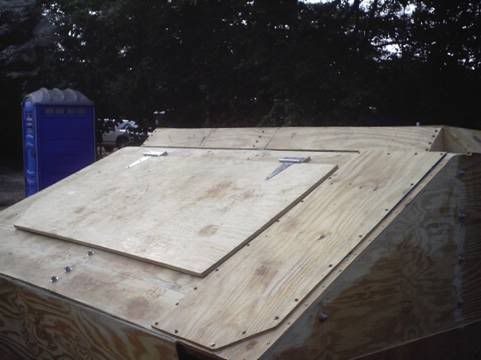
This is what the turret section looked like right before we put it on the tank. Notice ODX 221 Wallace in the background
Traverse
I don’t claim to be the powered traverse guru. But I do have a lot of experience with them. I have not built or even seen one yet that has not failed. This is hands down the hardest part of the build. It is also the most expensive part of the build. The turret guide ring cost about $300-$400 to build alone and is simply a big wooden ring with roller casters on the bottom. The ring consumed about 20 sheets of ¾” ply wood alone. It is heavy and time consuming and there must be a better way but this is how we did it and it will probably be a part added to our pile of crap eventually. But the idea is to make the turret rotate (and it doesn’t want to) I will not go into a bunch of techno babble about this aspect of my build since I am not particularly proud if it at the moment. But I do offer my pictures to give you some ideas. Bear in mind I was not alone in building this. All favors were called in and several engineering buddies were used in an effort to make something work that should not. It will be redesigned and work flawlessly sooner or later.
Traverse consisted of a frame built out of strut, a Dana 30 rear axel heavily modified, and an ATV winch. It is connected with a triple belt drive and has a 3:1 pulley ratio with a 3.83 ring and pinion ratio.
Conclusions
This concludes the primary build of the ODX 225 Bradley. Stay tuned for updates and we look forward to seeing you on the fields of battle. ODX christened their new tank in battle at their home field Command Decisions War-game Center on 22 Nov 2007 during MPP Guadalcanal with 4 kills and a pick up crew. Over all I am pleased with her performance and am prepared to hold on for the endless journey I have started.
PINTADO e EM AÇÃO

Quem sabe um dia nós entramos realmente no Real Action, Milsim Paintball